https://youtu.be/N4MYEXsuNp0 We’re excited to officially launch Introduction to Mastering MikroTik — a practical, real-world training built to…

How to SAFELY speed test on your MikroTik Gear
Can running a BTEST be dangerous?
YES! I can’t tell you how many times we’ve seen someone fire off a MikroTik BTEST to verify connectivity and bandwidth capacity between a couple of MikroTiks and not only cause themselves a painful outage, but also require a truck roll for an on-site visit to remediate. Ouch!
In this article we’ll share a couple ways to ensure that you’re being a good steward of your network while also validating your available bandwidth capacity without resulting in outages or degraded services.
What’s the problem?
First, let’s describe what happens and why bad things can occur when you run a MikroTik BTEST bandwidth-test, then we can go into what steps can be taken to protect against it.
Let’s start with some documentation from MikroTik:
The Speed Test is an easy test tool for measuring ping, jitter, TCP and UDP throughput from one MikroTik device, to another. The “speed-test” command is based on the Ping Tool and Bandwidth Test. In order to use this command – Bandwidth test server needs to be accessible.
So far, sounds safe enough, right? Here’s the deal though – if you like the GUI of Winbox, and most MikroTik users do – it’s much too easy to start a BTEST without setting any protections and filling your network pipe so full in one, or worse BOTH, directions, that you can’t regain enough control to hit the STOP button after you’ve STARTED a BTEST.
Here’s an example:
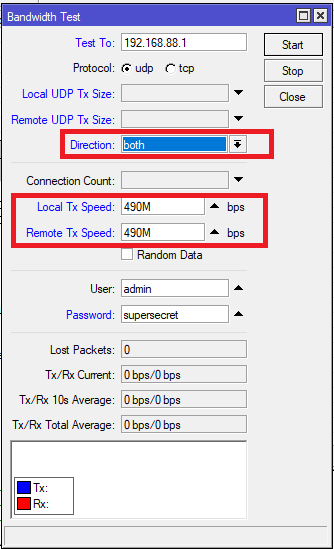
You jump into WINBOX and go to TOOLS –> BANDWIDTH-TEST, fill in the info of another MikroTik somewhere else on the network that you want to validate the transit bandwidth capacity in between, and you hit START. Let’s say between these routers is an RF link that can carry 500 Mbps, and the physical interfaces on the two MikroTiks are Gigabit Ethernet.
Whether you’re sending traffic only in RECEIVE – which is the default setting – or if you’ve tried to get a quick look at traffic in BOTH directions – there’s a problem here.
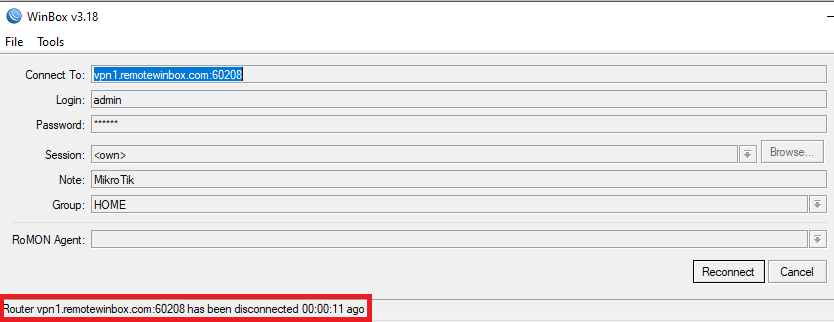
MikroTik A will send 1Gbps of traffic (what we call line rate) toward MikroTik B because that’s the speed of the physical interface. Because there’s really only 500 Mbps between them, saturation will occur, and unfortunately all too often your session to WINBOX will terminate and drop the connection as the pipe is overflowing with dropped packets.

As soon as WINBOX has terminated, you’re in trouble because BTEST is running and there’s often no good way to shut it off remotely, resulting in an outage (or at least degraded service) as the pipe between the routers is filled up with random BTEST packets and data.
So, how do we ensure this doesn’t happen?
Three ways you can ensure a safe a speed test:
- Perform the test in safe mode
- Set a duration for a max runtime
- Set a max bandwidth
Setting Safe Mode
The first thing I do when connecting to a MikroTik with Winbox is to turn on SAFE-MODE. Safe mode can protect you from all sorts of misconfigurations and prevent you from having a bad day in many scenarios. Using safe mode will still trigger the behavior above, resulting in a brief outage or degraded service for just a couple seconds while the MikroTik figures out that the Winbox session has terminated and is no longer active, and then it will roll back any and all commands taken between engaging safe mode and when the Winbox session became disconnected. So instead of having to go onsite to terminate the speedtest (with either a reboot, unplugging the overflowing physical port media, or connecting to the router locally) the router will itself revert the speedtest and go back into normal operations, allowing you to reconnect to Winbox in seconds. Not great, but definitely better than a full blown outage.
How to set Safe Mode in Winbox:
In the upper left of Winbox is a button to set Safe Mode. You just click it, and if anything bad happens to your Winbox session the MikroTik will undo anything that’s happened after clicking it. Nice!

How to set Safe Mode in the CLI:
In the CLI, safe mode is entered by pressing [CTRL]+[X]. To save changes and quit safe mode, press [CTRL]+[X] again. To exit without saving the made changes, hit [CTRL]+[D]

Read on for how to run even SAFER BTESTs.
Put a limit on how long it can run
This simple trick will allow you to guarantee that the BTEST will end soon and not keep running indefinitely. Unfortunately, this option isn’t available in Winbox – it’s command line only! In the example below, you can see how to set a 10 second maximum run on the speedtest so that even if it congests your pipe, it will quickly finish and stop blasting random test data at line rate so that normal traffic flow can resume.
How to set a Duration:
/tool speed-test address=192.168.88.1 duration=10s
Put a limit on the max bandwidth that BTEST will send
Setting a maximum bandwidth value can also prevent oversubscribing your transport network with too much data from the BTEST. Consider that with our above example of Gigabit Ethernet physical ports connected to some RF radios that are synced up at 500 Mbps, in our example below you can see how we set a maximum bandwidth of 490 Mbps. It’s a good idea to leave some room for other traffic and even in this case, it’s pretty likely that you’ll degrade forwarded traffic through the router by using a value that is so close to the maximum.

Even better would be to check for current traffic levels using TORCH or looking at traffic graphs on the interface, and then deducting the current traffic from the maximum available to come up with a relatively safe value to use. For example, if I saw that my normal traffic level was 120 Mbps – 160 Mbps I’d personally try to set a max of 330 on my BTEST. 330 + 160 = 490, which is still under the 500 that should be available.
How to set Max bandwidth:
/tool speed-test address=192.168.88.1 local-tx-size=490M remote-tx-size=490M direction=both
For best safety, use all of our mechanisms in combination! Take safe mode just in case, set a max duration so that the BTEST will definitely end, AND set a maximum bandwidth so that you’re a lot less likely to kill your customers’ traffic:
/tool speed-test address=192.168.88.1 local-tx-speed=330M remote-tx-speed=330M direction=both duration=10s
Other things to keep in mind
BTEST is best used with a DUT – a device under test. Meaning that if I really want to ensure my test is accurate and valid, I should use 2 MikroTiks to send and receive the traffic and those should both NOT be the MikroTiks connected to the circuit I want to validate. This isn’t always feasible, but the idea is that to validate the circuit between MikroTik B & C below, A & D would run BTEST and B & C would just pass traffic with no BTEST consuming any CPU resources:
A (running BTEST) <—–> B <—–> RF (or other )LINK to certify <—–> C <—–> D (running BTEST)
Importantly, if you see that BTEST is consuming 100% of the CPU on one of your endpoints, you should know that the results are probably skewed low and may be significantly inaccurate!

Click Here for a complete listing of bandwidth speed-test properties.
And finally, a good QoS (Quality of Service) strategy shouldn’t be forgotten. It’s out of scope for this blog post, but with proper configuration you can ensure that BTEST traffic is at a lower priority than your production traffic and that is also another way to protect yourself and your customers from outages and degraded service.


