https://www.youtube.com/watch?v=TiKrWahs5pY Bridge Mode is where we get real with real-world operators—no vendor fluff, no theory-only…
MikroTik: Static DNS with dynamic IPs
If you host services from a home or small office connection, there’s a good chance your ISP gave you a dynamic public IP instead of a static one—which can make custom domains feel frustratingly unreliable. In this Case Study, we’ll walk through a practical MikroTik-based solution for automatically keeping your DNS records up to date whenever your WAN IP changes, using RouterOS scripting and the Cloudflare API. The result is a clean, router-native approach that avoids extra always-on helper devices, reduces downtime between IP changes and DNS updates, and shows off one of the reasons MikroTik is such a powerful platform for homelab and self-hosted networking projects.
Key Restrictions:
- RouterOS v7 (though the thought process can still aid in similar implementations for RouterOS v6).
- Cloudflare is my DNS provider. Again, the general implementation is expected to be similar across providers, so this guide will still be useful for people with other providers with some adjustments.
For homelabs, a common issue can be getting access to static IPs so you can set and forget an IP for your custom domains. In general, most ISPs assign IPs to their customers dynamically, by default, while hiding static IPs behind either a paid add-on or–more commonly–behind a business tier/contract. The former option (paying for a static IP) has also become less common over time.
This issue–mixing dynamic IPs with DNS records–has spawned several protocols, services, and router software integrations for “dynamic DNS.” Support among domain providers for dynamic DNS can be sparse or difficult to set up, and often has lacking documentation. There is software available that attempts to remedy this issue behind your router (on your local network), by periodically connecting to some service on the Internet to resolve your public IP and then updating DNS records using the APIs provided by domain providers.
Unfortunately, this inherently requires some machine to run the software and periodic “polling” which can mean service downtime in between lease expiry and polling. When you consider that your router’s DHCP client knows when it renews an IP lease, it should be easy to quickly update pointers using the APIs provided by domain providers.
In general, though, it really isn’t simple to hook into a router’s DHCP client such that you can make arbitrary API calls to update your domain when your IP is updated. In the past, I’ve even tried to turn a Raspberry Pi into a router capable of this, and it can still be quite complicated to set up in Linux.
Here, a MikroTik can really show its power.
Process
The introduction spelt out two main difficulties:
- Hooking into a router’s DHCP client, so you can perform some action when your router’s IP is updated.
- Making arbitrary API calls to update DNS records.
While planning this implementation, I decided on three points of research:
- I was almost certain that RouterOS allowed you to execute an arbitrary script on lease renewal. This direction would address the first challenge.
- If I could execute an arbitrary script upon lease renewal, then I needed some way to make API calls. One plan in this regard was to simply call out to a local service written in NodeJS, for example, that would make API calls for me.
- Similarly, I know MikroTiks can make arbitrary HTTP calls. This along with RouterOS’s scripting capabilities would allow me to update the domain records on my router.
Ultimately, I formulated the following plan:
- Hook into RouterOS’s DHCP client to detect newly bound IPs.
- Perform an API call on the router to create/update my domain.
This plan was made because Cloudflare (my domain provider) has an API that is easy to call with simple HTTP requests. My experience with Google Cloud’s APIs (needing to generate cryptographic tokens from API keys) also tells me that other setups might benefit from using a locally hosted service in a more feature-complete programming language. Additionally, with a MikroTik running RouterOS v6 it would almost certainly be easier to do this on a locally hosted service, as some ease-of-use tools (like JSON parsing) were only introduced in RouterOS v7.
Implementation
Now that the plan is formulated, I can get onto the implementation.
Making Cloudflare API Calls
Resources: https://developers.cloudflare.com/api/resources/dns/subresources/records/
First, you’ll want to create an API token with which you can update DNS records within your domain’s zone.
In the Cloudflare Dashboard’s home:
- Go to Manage Account > Account API Tokens
- Click on Create Token to create a token
- Use the Edit Zone DNS template to create the token.
After you’ve created the token, you can start making API calls to query/update your records.
You can use the following RouterOS command to test that your API token works, substituting $ZONE_ID and $CLOUDFLARE_API_TOKEN with their respective values:
/tool fetch \
    mode=https \
    url="https://api.cloudflare.com/client/v4/zones/$ZONE_ID/dns_records" \
    http-header-field="Authorization: Bearer $CLOUDFLARE_API_TOKEN" \
    output=user
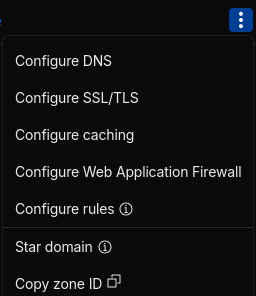
You can find the Zone ID by going to your Domains listing, clicking the three dots next to the domain you wish to manage, and then clicking “Copy zone ID”:
If your API token works, and you get back a JSON response where the success field is true, then you’re ready to create the script that can update your desired A record.
Making the Script and Configuring DHCP
You’ll want to open an editor of your choice (e.g. Notepad), copy the script, and save the script to a file. Here, the script follows–make sure to replace the values at the top:
{
  # # # # # # # #
  # Configure these to match your respective values...
  :local "CLOUDFLARE_API_KEY" "XXXXXXXXXXXXXXXXXXXXXX"
  :local "CLOUDFLARE_ZONE_ID" "xxxxxxxxxxxxxxxxxxxxxx"
  :local "DOMAIN_NAME" "example.com"
  # # # # # # # #

  :local record {
    type="A"
    name=$"DOMAIN_NAME"
    ttl=60
    # Uncomment these lines if you don't want your
    # traffic proxied.
    # proxied=false
  }

  # Re-usable values for DRY...
  :local "API_PREFIX" ("https://api.cloudflare.com/client/v4/zones/" . $"CLOUDFLARE_ZONE_ID" . "/dns_records")
  :local requestHeaders ("Authorization: Bearer " . $"CLOUDFLARE_API_KEY")

  # Function for making a get request and parsing
  # the response as JSON.
  :local getRequest do={
    :local response [
      /tool fetch mode=https \
        url=$url \
        http-header-field=$requestHeaders \
        output=user \
        as-value
    ]

    :local response ($response->"data")
    :local response [:deserialize from=json value=$response]

    :return $response
  }

  # Function for making a request with an arbitrary
  # method and a JSON body.
  :local bodyRequest do={
    :put ("URL: " . $url)

    :local innerRequestHeaders ($requestHeaders . ", Content-Type: application/json")
    :local response [
      /tool fetch mode=https \
        url=$url \
        http-method=$httpMethod \
        http-header-field=$innerRequestHeaders \
        http-data=[:serialize to=json value=$httpData] \
        output=user \
        as-value
    ]

    :local response ($response->"data")
    :local response [:deserialize from=json value=$response]

    :return $response
  }

  # Helper for checking for request success...
  :local checkError do={
    :if (!($response->"success")) do={
      :error ("Request failed..." . [:tostr ($response->"errors")])
    }
  }

  # If we are binding a DHCP address...
  :if ($bound = 1) do={
    :delay 1

    # Request the domain's current A record...
    :local requestURL ($"API_PREFIX" . "?name.exact=" . [:convert to=url value=$"DOMAIN_NAME"])
    :local requestURL ($requestURL . "&type=A")

    :local response [
      $getRequest requestHeaders=$requestHeaders url=$requestURL
    ]

    $checkError response=$response

    :local response ($response->"result")
    :local response [:pick $response 0]

    # If a record already exists...
    :if ([:typeof $response] != "nil") do={
      # ... then check for a change and PATCH if changed.
      :local currentIP ($response->"content")

      :if ($currentIP != $"lease-address") do={
        :local requestURL ($"API_PREFIX" . "/" . ($response->"id"))
        :set ($record->"content") $"lease-address"

        :local response [
          $bodyRequest \
            requestHeaders=$requestHeaders \
            url=$requestURL \
            httpMethod="patch" \
            httpData=$record
        ]

        $checkError response=$response

        :log info "DHCP renewed and changed... DNS updated."
      } else={
        :log info "DHCP renewed but not changed..."
      }
    } else={
      # ... if record doesn't exist, then create one.
      :set ($record->"content") $"lease-address"

      :local response [
        $bodyRequest \
          requestHeaders=$requestHeaders \
          url=$"API_PREFIX" \
          httpMethod="post" \
          httpData=$record
      ]

      $checkError response=$response

      :log info "DHCP renewed... DNS record created."
    }
  }
}
In order to upload the script to your router, you can either use SSH-based SCP file transfer, or you can use Winbox as imaged below:
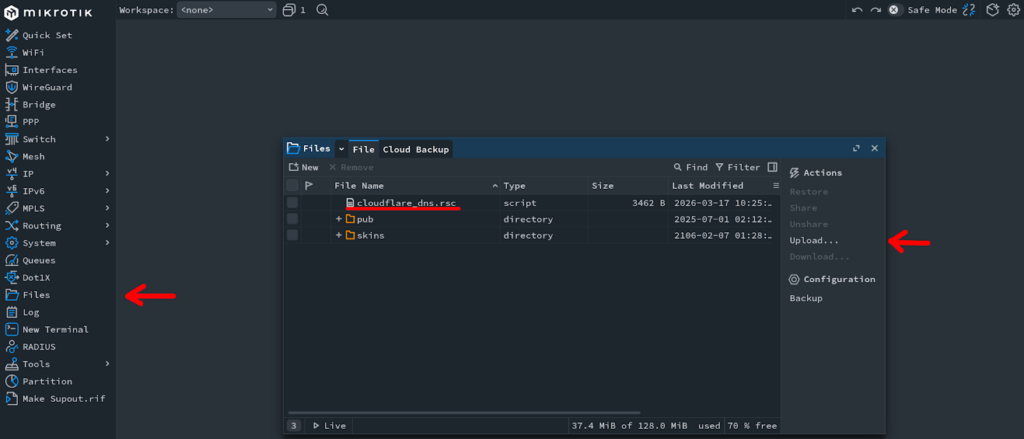
Here, I just copied the script into a file, named the file cloudflare_dns.rsc, then uploaded said file to the router.
After uploading the script, you’re ready to configure your router’s DHCP client to actually use the script. You can start by first printing your DHCP configuration:
/ip dhcp-client print… and then select which DHCP configuration your router uses to get its WAN IP. In general, for most router configurations it will be the first configuration, numbered 0.
After confirming which DHCP configuration to apply the script to, you can run this command to set the script (replacing $FILE_NAME to the name you uploaded the script as) :
/ip dhcp-client set numbers=0 script=[/file get $FILE_NAME contents]… this should make it so subsequent changes to your IP will automatically update your Cloudflare domain. To force an IP renewal–and incidentally the script to run–you can release/renew your DHCP lease:
/ip dhcp-client release numbers=0
Wrap up:
Now I can use my custom domain anytime I want access to any of the services I host. It’s all automated and easy to remember!
I created this step by step tutorial in the hopes that someone else out there might save some time and effort, as well as learn something. The flexibility of what can be done with a MikroTik is part of why I love the platform.
Related Posts