https://youtu.be/dAq4-usywxU In part two of Episode 4, Tyler Casey of DMTech walks Marc through a…
How to setup a MikroTik CHR on Proxmox
A step-by-step guide on how to set up a MikroTik Cloud Hosted Router in a Proxmox hypervisor.
First off, we have to get the VM image from MikroTik’s website onto your Proxmox server.
- Click on Open SHELL on the main menu
- wget https://download.mikrotik.com/routeros/6.48.6/chr-6.48.6.img.zip
- apt-get update
- apt-get upgrade
- apt-get install unzip
- unzip chr-6.48.6.img.zip
- qemu-img convert -f raw -O qcow2 /root/chr-6.48.6.img /chr-6.48.6.qcow2
Now we can set up a shell VM that we’re going to use to load this CHR image on
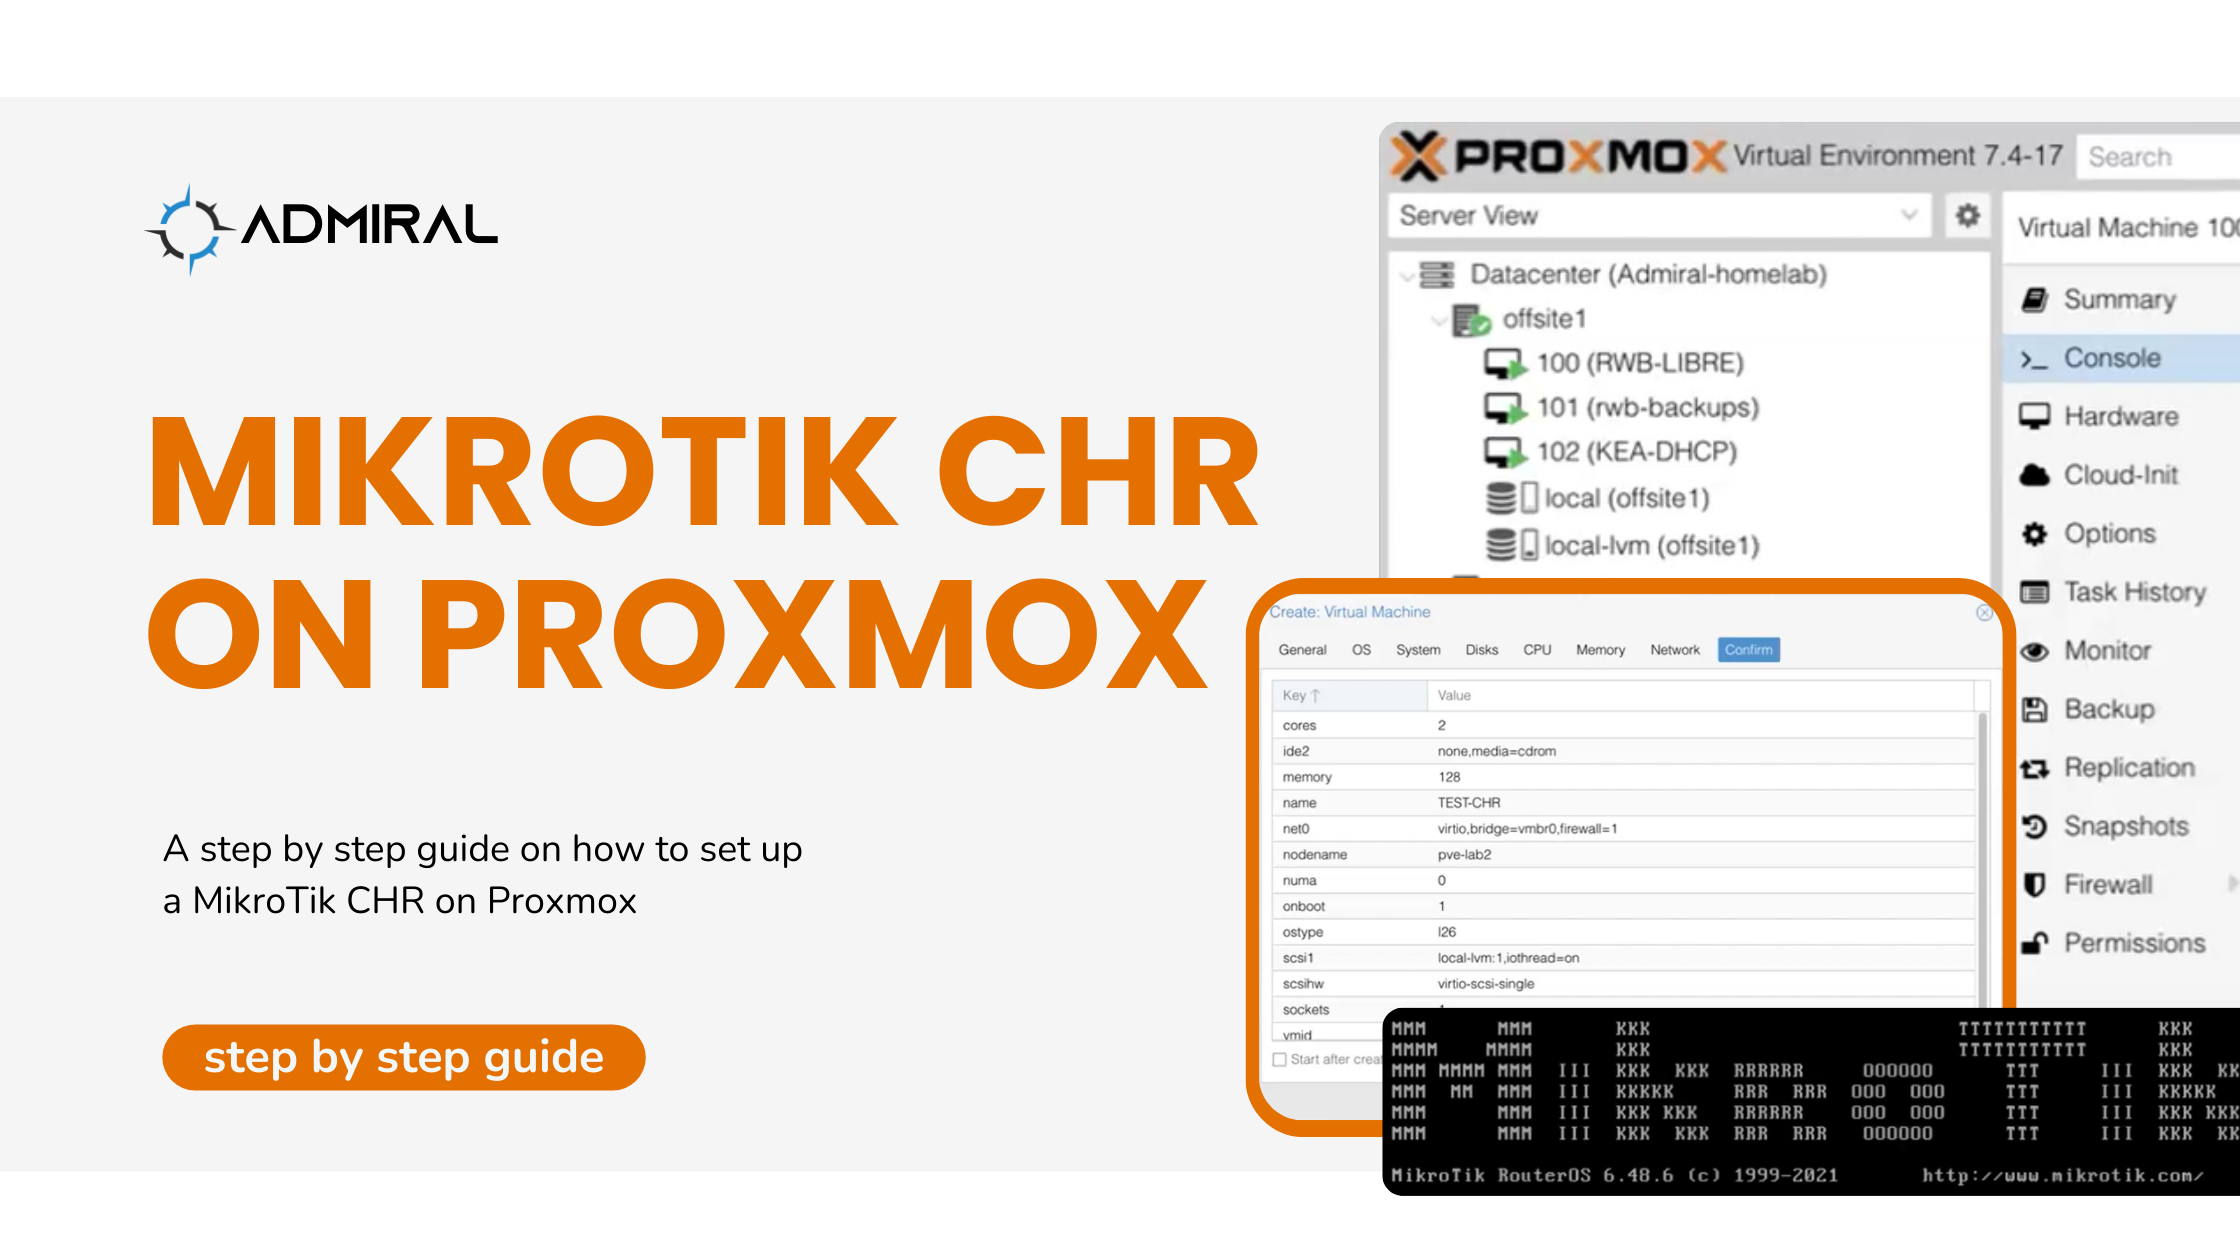
- Navigate to the Create a new VM button
- On the General Tab:
- Node = Choose appropriate Node (if you have multiple Proxmox hypervisors – if you only have one you can leave this alone)
- Your VM ID is arbitrary, so you can pick a number or just use whatever the system assigned. Keep in mind that valid VM IDs start at 100 and can go up to 9 digits. IMPORTANT! Remember this VM ID because we’ll need it to successfully convert the CHR image for it’s virtual disk later on.
- Name is a label for you and can be whatever you want to call it. I’ll call mine TEST. If you want this VM to autostart when Proxmox reboots, make sure “Advanced” is checked and you can mark “Start at Boot:”
- Click next
- On the OS Tab:
- Select “Do not use any media” and click next
- System Tab:
- No Changes, just leave it alone and click next
- In the Disks Tab this step is critical to a later step:
- Simply Change SCSI from 0 to 1
- And note: By default, the MikroTik disk image size is 64MB. If you want to give your CHR more room for packet captures, logs, user-manager, or whatever, you can change the disk size here up to 16GB. You can give it more, but it can’t use any more than 16GB. I typically give my general purpose CHRs 1GB if I’m not sure what it’s going to do for me, and keep in mind you can always give the VM more disk later.
- CPU Tab:
- Set your CHR for whatever makes sense for your VM needs and physical hardware. For this lab, I only have 1 CPU with 4 cores, so I match that in virtualization. On some of our production Proxmox installs we use Dual Core Xeons and will put 2 sockets and 14 cores. For testing, you can certainly use 1 socket 1 core, but I’d recommend at least 2 cores if you’ll be throwing anything at your CHR so that it can at least do a little bit of multitasking.
- 1 sockets
- 2 cores
- Memory Tab:
- Here’s another arbitrary selection. For a VPN concentrator, I use 128K of RAM times however many PPP clients I’m going to expect. For example, I’d use 1GB of RAM for roughly planning for one thousand clients. This is another value you can adjust later, so feel free to start with the minimum of 128M of RAM for ROS6 or 256M for ROS7.
- Set your Memory (Mib): = 128 and click next
- Network Tab:
- No changes and click next
- Confirm Tab:
- VERY IMPORTANT! DO NOT select “Start after created” If you do start the VM before completing the next steps, I don’t suggest you try and fix it. It’s much easier to just delete the whole VM and start over again at the first step. Next up is where it’ll get a little tricky the first time, but once you’ve got this done it’s no big deal.
- Click “Confirm”
- On the General Tab:
- Once again we need to run a command from the terminal, so Open Shell
- Remember that VM ID from earlier, we need that for this next step. Running this command will convert the raw image we downloaded earlier into a format that Proxmox can use.
- qm importdisk 120 /chr-6.48.6.qcow2 local-lvm
- After hitting enter, you’re waiting for it to say Successfully imported…
- And here’s the trickiest part that confused me when I first got started and is absolutely critical to getting your CHR to boot correctly: Now Click on your Newly Created VM on the left menu
- Click “Hardware”
- Open “UNUSED DISK 0”
- Make no changes and click “ADD”
- Now select SCSI 1 and click DETACH
- And then Click on UNUSED DISK 0 and hit REMOVE
- And we’re almost done – now Open Options → go to Boot order → click to enable local-lvm (scsi0) and make it #1 by dragging and dropping it to the top
- Change start at boot = yes and finally, we can start the VM
- Click “Hardware”
- Now, click on console and we can watch the VM boot up and in a few seconds, we can login.
And there we have it, a MikroTik CHR is now running on your Proxmox installation!
Remember, if you’re going to add any public IP addresses on this CHR, be sure to secure your router with a default firewall and I suggest adding a new user and disabling the default admin account or, at a minimum, putting a strong password on the admin account.
Check out our Firewall Filtering video for best security practices for firewall for MikroTik.
If you’re looking for a MikroTik management software, schedule a call with Marc to learn more about Admiral Platform.
Related Posts